
Too low for my equipment to protect me.
Welcome back. I hope everything has been going well for you—and, of course, that you’ve been staying safe at work. I’m here again to share practical guidance that can help you work even more safely, adding small but important insights to your safety knowledge. These tips are meant not only to help you, but also to be shared with others, creating a multiplying effect that strengthens overall safety awareness. Remember, safety saves lives—and passing on what you know can do the same.
Thank you in advance for taking the time to read this.
This article focuses on working at height and fall protection systems. It was written to address a common question that arises when working at heights that are relatively close to the ground or to nearby surfaces.

We’ve all seen it: a scaffold that is not very high—around 6 ft (1.8 m)—with workers performing tasks such as painting, cleaning, plastering, or replacing windows. To protect themselves, they connect their harness to an anchor point (often the scaffold itself) using a shock-absorbing lanyard, typically 6 ft (1.8 m) in length. And the question naturally comes up: What’s the point of using fall protection equipment here? If one of them falls, they would still hit the ground, since the lanyard alone is already 6 ft (1.8 m), not even counting the worker’s height.
Situations like this can be found in many areas across the industry.
NOTE: Sometimes the closest surface is not the ground. You may be working at a significant height, but if there is a nearby structure below—such as a balcony, walkway, overhead crane beam, or any other obstruction—you could strike that surface during a fall. In those cases, the distance to the ground becomes secondary.

You’ll agree that if the question raised in the previous example is not properly understood, it could lead someone to think that something is wrong with safety laws, protocols, or standards. After all, if work at height is defined in many places as starting at 6 ft (1.8 m), which requires the use of a fall protection system, and the shock-absorbing lanyard itself is already 6 ft (1.8 m) long, it may seem that the required fall protection system is unnecessary—or even useless—because it would not prevent you from hitting the ground in a fall.
NOTE: I’m using 6 ft (1.8 m) as a reference because it is one of the most common thresholds in the industry. However, some countries and companies establish lower limits depending on the task. In the United States, for example, OSHA sets the trigger height at 6 ft (1.82 m) for construction and 4 ft (1.21 m) for general industry.
Let’s continue. You may have noticed that I emphasized the phrase “misleading conclusion.” I did this to make one thing very clear: there is nothing wrong with safety laws, protocols, or standards. The issue here is a lack of understanding of the different tools available within fall protection.

It’s important not to misunderstand the terminology. When working at height, you are required to use a fall protection system, which must include at least three elements: Harness, Connector, and Anchorage.
If you look back at that definition, you’ll notice it does not say “shock-absorbing lanyard.” It says connector.
A connector is simply the element used to link the harness to the anchorage point. A shock-absorbing lanyard is only one type of connector. Just as there are different types of harnesses and anchorage points depending on the job, there are also different types of connectors that must be selected based on the specific conditions of the work scenario.
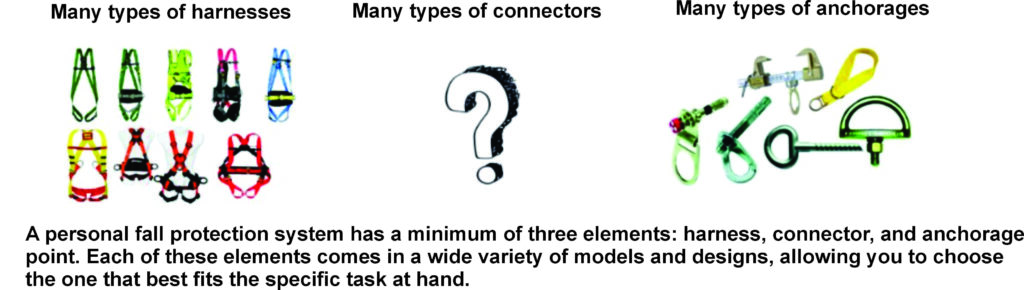
In the scaffold example mentioned earlier, the complete fall protection system is technically in place (harness, connector, and anchorage). However, the components being used are not appropriate for that specific situation. The issue is the use of an inadequate connector for the scenario. Due to its length and characteristics, it does not provide effective protection in the event of a fall when working close to the ground or to a nearby surface.
NOTE: I won’t go deeper into the definition of a “fall protection system” here, since that is not the focus of this article. I cover that topic in detail in a previous article, which you can review at the following link:
Now that you’ve seen there are different types of connectors depending on the situation, this article will focus on the ones that are appropriate when working close to the ground or to a nearby surface.
Before discussing those options, their features, and how versatile they are, it’s important to first understand the characteristics of the shock-absorbing lanyard. This is the most commonly used connector when working at height—and the one that is often used incorrectly as part of a fall protection system.
Typical characteristics of a shock-absorbing lanyard
A shock-absorbing lanyard is typically 6 ft (1.8 m) in length (some standards allow 6.5 ft (2 m)).
It includes double-locking snap hooks or rebar hooks. This double-locking mechanism prevents rollout—the involuntary opening of the hook caused by contact with the anchorage structure or other external elements.
It incorporates an energy absorber, whose purpose is to reduce the impact forces transmitted to the body in the event of a fall (we’ll discuss this in more detail shortly).
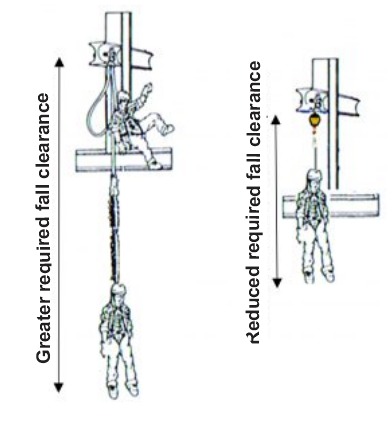
It also has a required fall clearance for proper use. I’ve left this characteristic for last because this is where the core issue of this article lies.

NOTE: Fall clearance is sometimes also referred to as clearance requirement.
What is fall clearance?
As mentioned earlier, this term is central to the topic of this article. Fall clearance is a critical factor when deciding how to configure your fall protection system. In simple terms, it determines whether a shock-absorbing lanyard is the right connector for your personal fall protection setup.
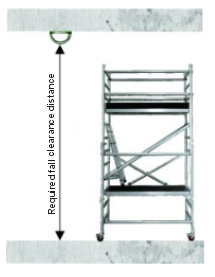
Fall clearance is the vertical distance between your anchorage point and the closest surface you could strike during a fall. This distance must be equal to or greater than the value specified by the manufacturer of the shock-absorbing lanyard you intend to use.
For example, imagine you are working on a platform that is 6.5 ft (2 m) above the ground, and your anchorage point is located above shoulder height at 13 ft (4 m) from the ground. In that case, your available fall clearance is 13 ft (4 m), since that is the distance between your anchorage point and the nearest surface.
Before working at height, you must determine the available fall clearance at the job site and compare it with the value specified by the manufacturer for the shock-absorbing lanyard. This required fall clearance is always listed on the product’s technical data sheet and labeling.
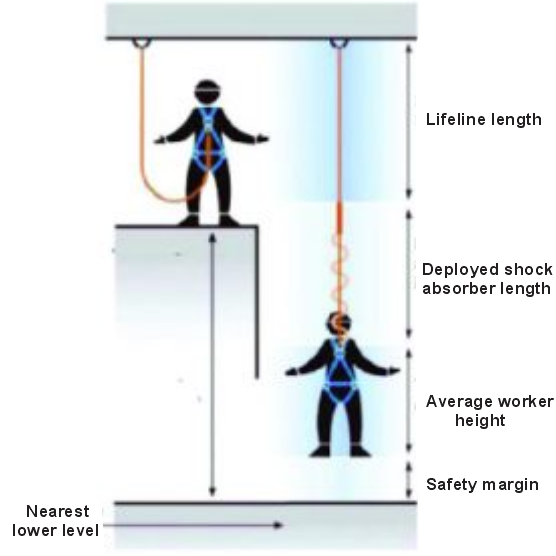
To establish the required fall clearance, manufacturers add together the following elements: the length of the lanyard, the full extension of the energy absorber during deployment, the average worker height, and a safety margin.
If the sum of these elements is greater than the distance between the anchorage point and the nearest surface at your work location, then you cannot use that shock-absorbing lanyard. You must select a different type of connector for your fall protection system.
NOTE: If the shock-absorbing lanyard is connected to a horizontal lifeline system, you must also add the additional clearance specified by the installer of that horizontal system.
Let me reinforce this point, because it is critical when working at height.
Imagine a shock-absorbing lanyard for which the manufacturer specifies the following values to determine required fall clearance:
- Lanyard length: 6 ft (1.8 m)
- Fully deployed energy absorber: 4 ft (1.20 m)
- Average worker height: 5.6 ft (1.70 m)
- Safety margin: 2 ft (0.60 m)
This results in a total required fall clearance of 17.4 ft (5.30 m).
This means that if the available distance between your anchorage point and the nearest surface at the job site is less than 17.4 ft (5.30 m), you cannot use that shock-absorbing lanyard, because in the event of a fall, you would still strike the surface below.
NOTE: You must always—always—check the manufacturer’s technical data sheet. This required fall clearance can vary depending on the brand, design, applicable standards, country of origin, and even the fall factor the equipment is designed for. Don’t get distracted by fall factor for now; simply follow the clearance requirement specified on the label or data sheet. These values may be 17 ft (5.20 m), 17.4 ft (5.30 m), 17.7 ft (5.40 m), 18.4 ft (5.60 m), and so on. This is why reading the manufacturer’s instructions is essential.
As you can see, the clearance required to safely use a shock-absorbing lanyard is significant—generally over 16 ft (5 m). For reference, a typical two-story house is around 18.7 ft (5.70 m) tall, a pedestrian bridge may be around 17 ft (5.20 m), the height of a tanker truck is often between 10–13 ft (3–4 m), and a small scissor lift may reach 20 ft (6 m).
These are just a few examples, but if you think about it, there are many situations in industry where this type of connector should not be used as part of the fall protection system. In those cases, you must consider other devices capable of stopping a fall within a much shorter distance, preventing impact with the nearest surface.
Before recommending which devices can solve this fall clearance issue, let me address a few common questions I’m often asked when explaining this topic.
What if I use a shorter lanyard?

In these articles, I always refer to the most common equipment used in the industry. In this case, I’m using as a reference the standard shock-absorbing lanyard most widely used in my country (6 ft).
It is true that some manufacturers, in order to offer more options to users, produce shorter or even adjustable shock-absorbing lanyards. These models also come with a shorter required fall clearance. However, they are not the most commonly used.
That is why you must always verify the fall clearance required by the manufacturer before selecting the lanyard.
What if I use a lanyard without a shock absorber?
There is a contradiction in that question. If the lanyard does not include a shock absorber, then it is not an approved lanyard to be used as a connector in a fall protection system.
To understand why, we need to briefly step aside and talk about impact forces.
The force generated during a fall is often underestimated. Many people assume that if a worker weighs, for example, 176 lb (80 kg), then the impact force will be about the same. Others think it may be slightly higher, or at most double the body weight. This is very far from reality.
A person weighing 176 lb does not generate 176 lb of force in a fall. You must also consider the acceleration that occurs as the body falls. The greater the fall distance, the greater the speed developed during the fall, and therefore, the greater the impact force. Falling from 3 ft is not the same as falling from 6 ft.

Even in a simplified scenario, impact force can be roughly estimated by multiplying body weight by gravity and by the fall height. This gives a value in joules (J), which can be translated into an equivalent force.
Using a simplified approach, a 176 lb person falling 6 ft can generate an impact force of over 3,000 lb.
If that person were connected to an anchor point using a lanyard without a shock absorber, the lanyard would stop the fall violently, transmitting the full impact force directly to the body. An impact of this magnitude can cause severe injury or death.
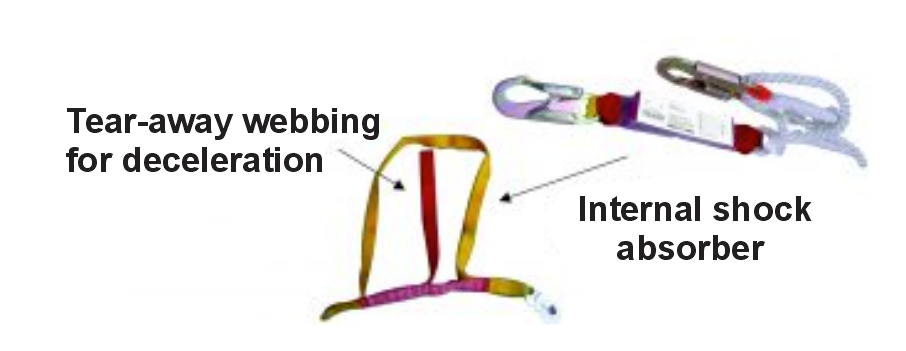
The shock absorber — the small pack located at the end of the lanyard — has a critical function: it reduces the impact force on the body by slowing down the deceleration during the fall. It works by tearing and deploying the internal webbing in a controlled manner as it extends, reducing the force transmitted to the worker to below 1,800 lb, as required by OSHA.
ANSI, on the other hand, references an average arrest force of 900 lb, measured throughout the deceleration process using load cells during testing. This is not because ANSI is stricter, but because it uses a different measurement approach.
This is why, when used as part of a personal fall protection system, a lanyard must include a shock absorber.
Now let’s solve the problem in question.

There are several devices that can help you solve the fall clearance problem. In this article, I will mention the two I recommend—not because they are the best, but because, in my personal opinion, they are the easiest to obtain and use.
NOTE: In this article, I am focusing on the use of PPE, where the user is directly involved in its use and, in most cases, its installation. I will not discuss engineering controls such as guardrails, parapets, guards, etc., as control measures here. However, remember that engineering controls should always be considered before relying on PPE.
Let’s continue. As mentioned earlier, I will recommend two devices that can effectively address the fall clearance issue.
The first one is the self-retracting lifeline (SRL).

A self-retracting lifeline is a drum-shaped device installed at the top of the structure you need to climb. Inside, it contains several feet of webbing or cable wound around an internal spool, with a double-locking snap hook at the end for the user to connect to their harness.
This device has an internal spring mechanism that automatically retracts the webbing or cable, similar to how a tape measure retracts into its case. As the user climbs and gets closer to the device, the line retracts automatically—this is where the name retractable comes from.
In addition to this retraction system, it also has an internal locking mechanism very similar to a car seat belt, which locks instantly under sudden tension.
Note: Cable or webbing is used depending on the type of work. For example, webbing should not be used for welding tasks.
The SRL is used to minimize the distance the body travels during a fall. When it locks automatically, it limits the fall to only a few inches. It also has a manufacturer-specified fall clearance requirement, sometimes referred to as “arrest distance.” For this reason, it is essential to always check the technical data sheet to verify the recommended fall clearance or arrest distance.
This device is a favorite in the industry, not only because of how practical and easy it is to use, but also because it is minimally intrusive. The user simply connects it to the dorsal D-ring of the harness and can focus on climbing, descending, and performing the task without constantly connecting and reconnecting hooks, as happens with a double shock-absorbing lanyard that must be repositioned continuously while climbing.
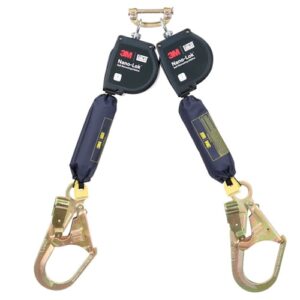
SRLs have become extremely popular for work at height. Some manufacturers even offer lanyards with small integrated retractable units to reduce arrest distance. They are very effective—I have used them myself. In addition to improving comfort, they partially solve the fall clearance issue (although these are not the most common devices, so I will leave that for a future article).
As you can see, the self-retracting lifeline is a highly effective fall protection tool for all the reasons described above. However, it is not the only option. Let me recommend another one:
The vertical anchorage system
In a previous article (which I will link a few paragraphs below), I discussed the vertical anchorage system in great detail—what it is, how it is configured, and what it is used for. Here, I will not go into extensive detail again. I will only explain how to use it to solve the fall clearance problem when working at low heights.
However, to do that, I still need to briefly explain how it works.
This system consists of installing a cable, rope, or line vertically from the top of the structure all the way down to the ground. A rope grab or fall arrester is placed on this line and connected to the user’s harness. This device travels along the rope, line, or cable as the user climbs or descends, and it locks automatically in the event of a fall, providing a very short stopping distance.

Because this system locks automatically when a fall occurs, it can be used only a few feet above the ground, connecting the rope grab directly to the user’s harness with a carabiner or similar connector.
For greater comfort during use, it can be used with a 4 D-ring harness, connecting the rope grab directly to the sternal D-ring.

NOTE: The portable or temporary vertical anchorage system can be connected either to the sternal or dorsal D-ring of the harness, depending on the type of work being performed. For example, I prefer connecting it to the dorsal D-ring when working on suspended scaffolds so that the rope is not in front of me and interfering with my work. When I use it to climb a structure, I prefer connecting it to the sternal D-ring because, being in front, it moves more smoothly along the rope, and since it is within reach, I can easily manipulate or remove it if necessary. In the case of a permanent or fixed vertical anchorage system, since it uses a tensioned steel cable that cannot move, it is always connected to the sternal D-ring for climbing.
I recommend reading the article where I explain horizontal and vertical anchorage systems, where you will find the definitions, components, and characteristics of these systems:
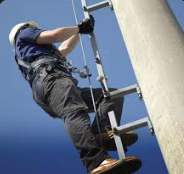
As you may already know from that article, there are two types of vertical anchorage systems: portable (temporary) and permanent (fixed). Even though the portable system can be used on fixed ladders, I recommend using the permanent steel cable system whenever possible, since a fixed ladder is a permanent element in the area and you will not need to repeatedly install and remove the system every time you climb up or down.
We can install the vertical anchorage system on the same anchorage points used for a self-retracting lifeline. The difference is that, in this case, there will always be a rope hanging down, which makes it slightly more intrusive than an SRL. We must also pay attention to the rope grab moving properly along the rope. Usually, it travels smoothly just with body movement, but we must always remain attentive, because if the rope is not kept tensioned, the device may not move freely. To prevent this, I usually add a small weight at the bottom of the rope or tie it off to the structure to keep it tensioned.
NOTE: If you plan to use a portable or temporary vertical anchorage system to solve the fall clearance problem, you must also verify the rope’s elongation characteristics. Excessive rope stretch under tension can cause you to reach the ground if the wrong rope is used. Different ropes have different elongation percentages depending on their material and construction (not all ropes are suitable for all applications). All of this information is found in the manufacturer’s technical data sheet, which is mandatory to review.
We can also use the vertical anchorage system in combination with the shock-absorbing lanyard.
We can also use the vertical anchorage system in combination with the shock-absorbing lanyard.
The vertical anchorage system can be used not only as a safety element when working at a height lower than the fall clearance recommended by the lanyard manufacturer, but also at greater heights as a safe access method until you reach that minimum required distance. To better explain this, let’s look at an example:
Imagine that for a specific task, you need to remain at the top of a scaffold that is 65.6 ft (20 m) high, and according to the technical data sheet of your shock-absorbing lanyard, the manufacturer requires a minimum fall clearance of 17.4 ft (5.30 m) from the anchorage point to the nearest surface (in this case, the ground).
At first glance, this may not seem like a problem, since the top of the scaffold is well above the minimum distance required by the manufacturer. However, this is not entirely true. Let me ask you something:

How did you get to the top without first being at less than 17.4 ft (5.30 m) from the ground, which is the minimum required by the manufacturer? Unless you have the ability to teleport to the top of the scaffold, you must start climbing from ground level, meaning you were unprotected during the ascent until you reached the 17.4 ft (5.30 m) mark.
You might say that the solution would be to install a vertical anchorage system with a 65.6 ft (20 m) rope and forget about the shock-absorbing lanyard altogether.
Yes, that would solve the problem. But it would also mean that every time you perform a similar task, you would need a rope length matching the height of that specific job—sometimes 65.6 ft (20 m), other times 98.4 ft (30 m), 131.2 ft (40 m), 164 ft (50 m), and so on. Remember, you will not always be working at the same height.
The solution I recommend to avoid constantly acquiring different rope lengths is to combine the vertical anchorage system with the shock-absorbing lanyard as follows:
Use a vertical anchorage system with only 17.4 ft (5.30 m) of rope (the minimum fall clearance required by the lanyard in this example). Install this 17.4 ft (5.30 m) vertical system on the scaffold and use it for climbing. Once you reach the safe height (the upper limit of the rope), switch to using your shock-absorbing lanyard, since you are now at a height where it can be used safely.

If multiple workers are involved, two or more 17.4 ft (5.30 m) vertical anchorage systems can be installed to speed up the work. Workers climb using the vertical system, and when they reach the designated height, they switch to the shock-absorbing lanyard and pass the rope grab down to the coworker below. When descending, they use the shock-absorbing lanyard until they reach the vertical system again, reconnect to it, and continue descending safely.
As you can see, in this example, the vertical anchorage system is used as a safe access method during the ascent and descent until reaching the height where the shock-absorbing lanyard becomes effective.
NOTE: Whenever possible, try to anchor to a structure or building independent from the scaffold. If you must use the scaffold as an anchorage point, you must ensure that it is suitable for that purpose. It must be stable, solid, strong, and properly secured to prevent collapse in the event of a fall. This can be achieved by tying it to the structure you are working on or by installing guy lines using cables, ropes, or solid supports. (It should go without saying that scaffolds and any structure used for access to height must be built according to a standard and be certified.)
With a little imagination, you will realize that this vertical anchorage system can be applied to many other scenarios, such as:
Suspended scaffolds or hanging platforms, by anchoring the vertical system to a structure on the roof. If the scaffold collapses or falls, you remain protected because you are anchored directly to the building through the vertical system.

Climbing poles or structures using portable ladders, by anchoring the vertical system to the pole with an anchorage sling or choke strap, keeping you secured to the structure in case the ladder collapses or you fall.

Are the three elements of a fall protection system still maintained?
The answer is YES.
As explained earlier in this article, it is called a vertical anchorage system because, being a system, it is made up of several components whose function is to create an anchorage with a vertical configuration (hence the name).
NOTE: Some protocols and standards consider the vertical anchorage system as an extension of the anchorage to which the system is connected (however, it is still considered the anchorage of the fall protection system).
We connect to the vertical anchorage system by means of a small connector, often a carabiner.
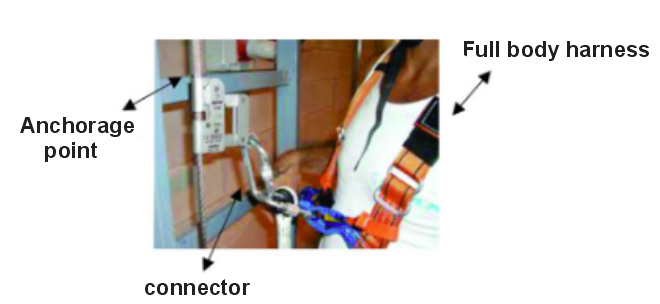
As you can see, the three minimum elements of the fall protection system are still present:
-
Harness (the one required for the task)
-
Connector (in this case, the carabiner is the connector)
-
Anchorage (the vertical anchorage system)
I hope this article has been helpful and useful when selecting the element that best fits your needs when working at height.
I wish you a safe day.
See you next time.
Author: Gianfranco Binda
Bison Up – High Access Specialist