
Anchorage Systems for Work at Height
Welcome back. I hope that, up to this point, my recommendations combined with your own safety knowledge have helped you work more safely in your daily tasks. In this article, I am fulfilling a promise I made in one of my previous technical articles. In that article, where I discussed anchor points, I mentioned that I would later write specifically about anchorage systems. I’m sharing the link here for you to review:
Now, let’s continue with the topic of this article.

Before we begin discussing anchorage systems for work at height, it is important to remember that a system is defined as a group of elements that work together to perform a specific function.
For example, a personal fall protection system is the combination of elements designed to protect a person in the event of a fall.
NOTE: I will not go into further detail about the differences between systems and equipment here, as that is not the purpose of this article. I have already covered this topic in greater depth in another article published in our virtual library. I’m sharing that link here for you to review:
With this in mind, we can say that an anchorage system for work at height is the combination of elements that work together to create an anchorage for work at height.
NOTE: Since these systems are considered anchorage points for work at height, they must meet the same requirements as any other anchorage used for work at height. For example, they must have a minimum strength of 5,000 lb (2,267 kg), along with many other characteristics explained in the link shared above.

At this point in the article, you may not yet be sure which elements I am referring to, since the technical term “anchorage systems” is not widely known or commonly used. However, even if the term itself is unfamiliar, I can assure you that you have seen these elements many times while working at height, as they are very common in many environments. Don’t worry—you will soon recognize exactly what I am referring to.
But first, although I don’t particularly like doing this, it is necessary at this point to be a bit more technical in order to clearly differentiate between the two main types of anchorage systems used for work at height.
Types of Anchorage Systems for Work at Height
Before moving forward, I want to make it clear that the different elements that make up anchorage systems are manufactured by reputable companies that not only guarantee their strength in accordance with safety standards, but also produce their own models—some of which can be very sophisticated in both design and construction.

In this article, I will use as examples the elements that, due to their simple design and construction, are the most economical and therefore the most commonly used in the market. Don’t worry—this does not exclude any brand or model. Remember, no matter how advanced or complex a product’s design may be, if it serves the same function as a simpler one, the purpose remains the same.
NOTE: When manufacturers design equipment, they do not change its function. They improve the design to make it more comfortable or easier to use. For example, there are many different types of rescue descenders on the market, each with a different shape. This variation exists only to improve user comfort, but they all perform the same function: descending a rope.
Now, let’s continue with this section. As mentioned earlier, there are two main types of anchorage systems for work at height:
-
- Vertical Anchorage Systems for Work at Height
-
- Horizontal Anchorage Systems for Work at Height
Vertical Anchorage Systems for Work at Height
As the name indicates, a vertical anchorage system for work at height is a set of elements that form an anchorage arranged in a vertical configuration. You may have seen these systems on fixed ladders, suspended or supported scaffolds, and they are also commonly used as backup lines in rope access work.

These vertical anchorage systems can be found in two forms: fixed or permanent, and temporary or portable.
Fixed or Permanent Vertical Anchorage Systems
You have very likely encountered these vertical anchorage systems before, as they are widely used for climbing telecommunications towers, poles, vertical ladders commonly found in industry, and similar structures. A fixed or permanent vertical anchorage system is the steel cable that runs from the top to the bottom of the structure to be climbed and is used together with a cable fall arrester.
Its configuration typically includes the following elements:
Top Support
This element is located at the top of the structure to be climbed and is where the upper end of the steel cable is attached. It must be installed on a structure capable of supporting at least 5,000 lb (2,267 kg).
Bottom Support
Despite its name, this is not always a “support” in the traditional sense. Its function is to keep the steel cable properly tensioned and centered along the structure being climbed. It may consist, for example, of a simple anchor point fixed to a concrete surface or a fixed bracket at the lower part of the structure.
Steel Cable

Depending on how aggressive the surrounding environment is, the cable may be galvanized or stainless steel. Its diameter typically ranges from 3/8 in to 1/2 in (9.5 to 12.7 mm). It has a 7×19 construction (7 strands with 19 wires per strand). The cable must include thimbles at both ends to protect it where it connects to the top and bottom supports. It usually includes a turnbuckle at the bottom to tension the cable during installation, and in some cases, a tension absorber at the top to reduce the load on the top support caused by the combined weight of the cable and the user in the event of a fall.
NOTE: This is the most commonly used type of cable for these systems. Some manufacturers may use different cable constructions or specifications. What truly matters is that the cable meets the minimum strength requirements established by the applicable safety standards.
Cable Fall Arrester
This is the element that stops a fall if one occurs. It is placed on the steel cable and moves freely up and down, locking automatically when it receives downward force. This device is connected to the user’s harness by means of a small connector, such as a carabiner, attached to the pectoral D-ring of the harness.
Optional Guides
These systems may include guides installed between the top and bottom supports to keep the cable centered along the structure being climbed.
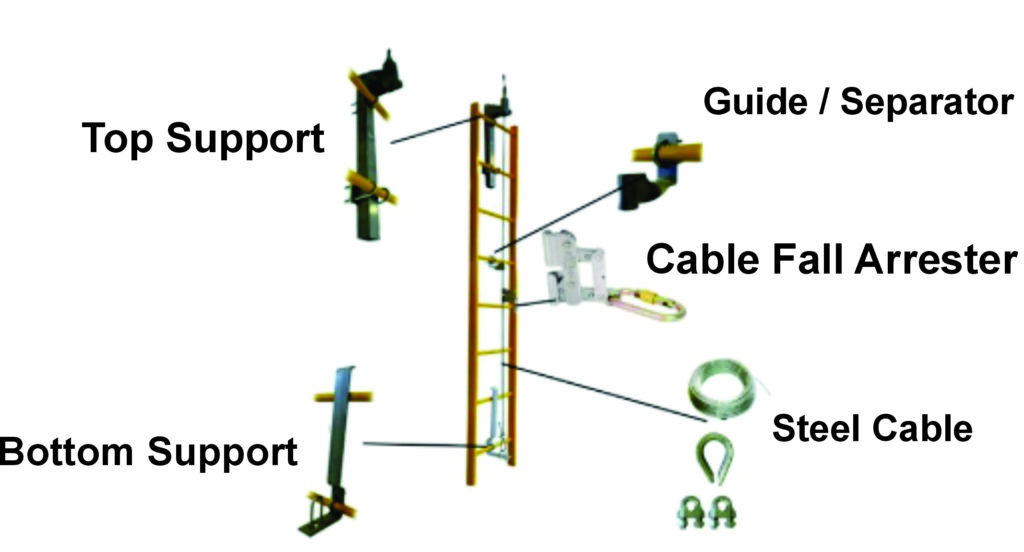
NOTE: The images shown for the elements of the vertical anchorage system are for reference only. Each manufacturer has its own designs for the components mentioned above.
Temporary or Portable Vertical Anchorage System
The difference between this temporary or portable system and the previous one is that it does not remain permanently installed on the structure to be climbed. It is installed before work begins and removed at the end of the workday. It is commonly used on supported scaffolds, suspended scaffolds, poles, and in situations where it is necessary to reduce free fall distance.
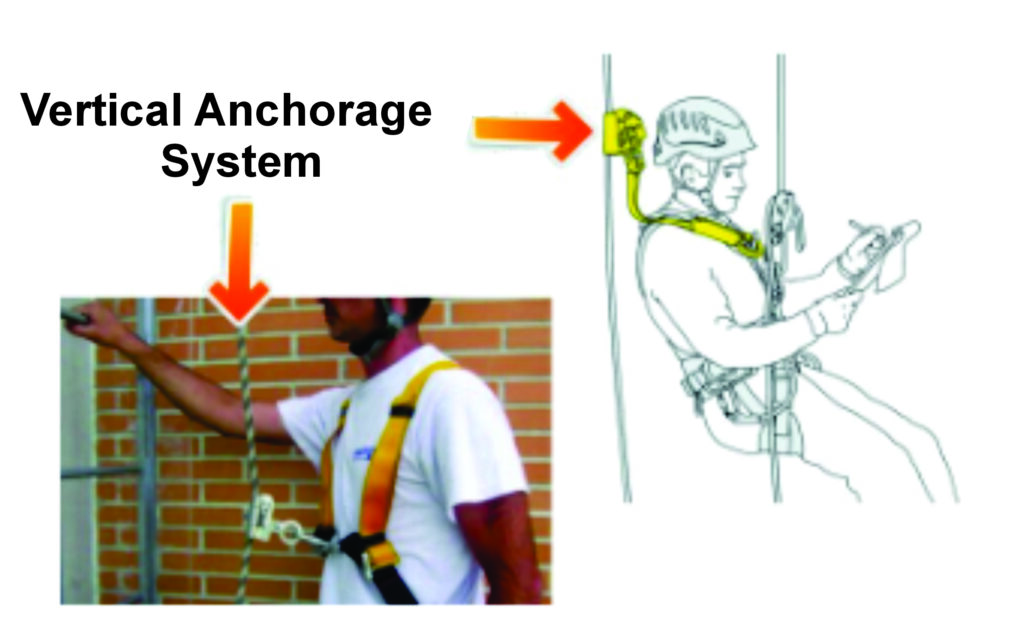
Its configuration typically includes the following elements:
Certified Twisted Rope

The rope used in this vertical anchorage system serves the same function as the steel cable in a fixed or permanent vertical anchorage system. A twisted rope is used because it is installed and removed daily. As you can imagine, twisted ropes are much lighter than steel cables—imagine having to install and remove a heavy steel cable every day.
These ropes must be manufactured by reputable companies to ensure they meet safety standards.
Manufacturers often add a hook at the top end so it can be connected directly to the structure or to an anchorage sling if necessary. The bottom end may have a hook or a weight to keep the rope properly tensioned.
If the rope is used for rope access work, it must be tied with a rope access knot such as a figure-eight, figure-nine, double-loop, or similar.
This system must be installed on structures capable of supporting at least 5,000 lb (2,267 kg).
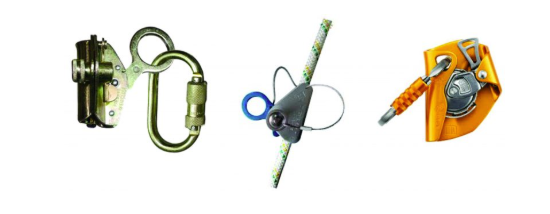
Rope Fall Arrester
This device performs the same function on the twisted rope as the cable fall arrester does on the steel cable in a fixed vertical anchorage system. The difference is that it can be connected either to the pectoral D-ring or to the dorsal D-ring of the harness, depending on user comfort.
Horizontal Anchorage Systems for Work at Height
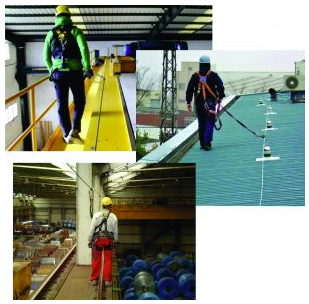
As the name indicates, this is a group of elements designed to create an anchorage arranged in a horizontal configuration. You have very likely seen these systems before, as they are widely used in industry. A very common example is the steel cables or ropes installed on rooftops, where we connect our shock-absorbing lanyard to move safely across the surface.
They are also commonly used for movement on scaffolds, roofs, beams, truck hoppers, and similar structures.
It is important to emphasize that special care must be taken with the configuration of these systems. Due to their apparent simplicity, they are often underestimated during installation, which leads many people to improvise by using incorrect elements or improper configurations. Remember that these systems must be installed in accordance with safety standards and quality regulations to ensure they are truly safe.
With this in mind, let me explain the three most common types of horizontal anchorage systems:
Fixed or Permanent Horizontal Anchorage System
This horizontal anchorage system is installed and remains permanently in the location where it will be used. There is no single place where these systems are typically found, as they are very versatile. They can be installed in many environments, such as the exterior areas of rooftops, inside industrial plants, or at the top of tall structures for maintenance work.
Fixed or permanent horizontal anchorage systems can be found in two configurations:
-
- Low Horizontal Systems
-
- Elevated Horizontal Systems
The difference between these two types has nothing to do with their elements or configuration. In fact, both use the same components and setup. The difference lies in their height. Low horizontal systems can be installed anywhere from floor level up to a maximum of 6 ft (1.8 m)—you should be able to reach them by hand. Elevated systems, on the other hand, are installed at heights that cannot be reached by hand.
I will not go into further detail about these systems here, since both must follow the same configuration. What I will explain later will make it clear how each one is used.
Let’s look at the components and configuration of these systems:
Primary Supports
These are the elements where the ends of the cable are attached. They may be anchor points, posts, or specially fabricated components for this purpose. Like any anchorage, they must be installed on structures capable of supporting at least 5,000 lb (2,267 kg).

Secondary or Intermediate Supports
These supports are used to carry the weight of the cable. The cable is not tied or secured here—it simply passes through. They are installed between the primary supports with a maximum spacing of 33 ft (10 m) between each one.
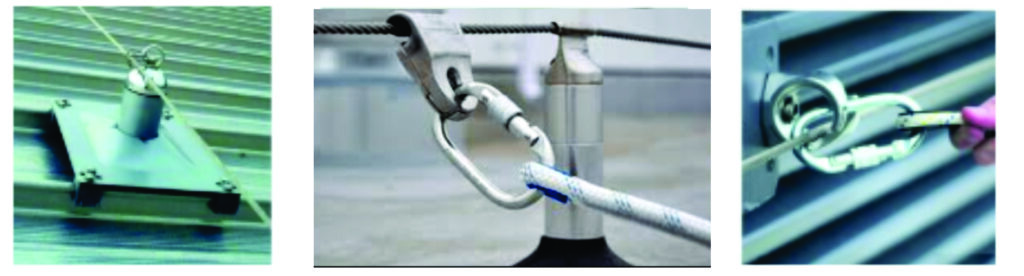
NOTE: These supports help carry the weight of the cable, since properly tensioning a very long cable is difficult. If over-tensioned, excessive force would be applied to the primary supports.
Steel Cable
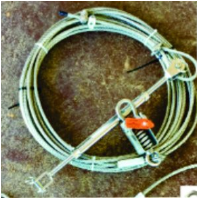
Depending on how aggressive the environment is, the cable may be galvanized or stainless steel. Its diameter typically ranges from 3/8 in to 1/2 in (9.5 to 12.7 mm), with a 7×19 construction (7 strands with 19 wires per strand). It must have thimbles at both ends to protect the cable where it connects to the primary supports. A turnbuckle is usually included on one side to tension the cable during installation. In some cases, a tension absorber is also included to reduce the load that the primary supports may receive from the combined weight of the cable and the user in the event of a fall.
Important Considerations
As mentioned earlier, these systems must meet parameters that guarantee their quality and safety. This is achieved not only by ensuring that the components comply with safety standards and regulations, but also by respecting certain considerations in their configuration and use:
It Is Not a Guitar String

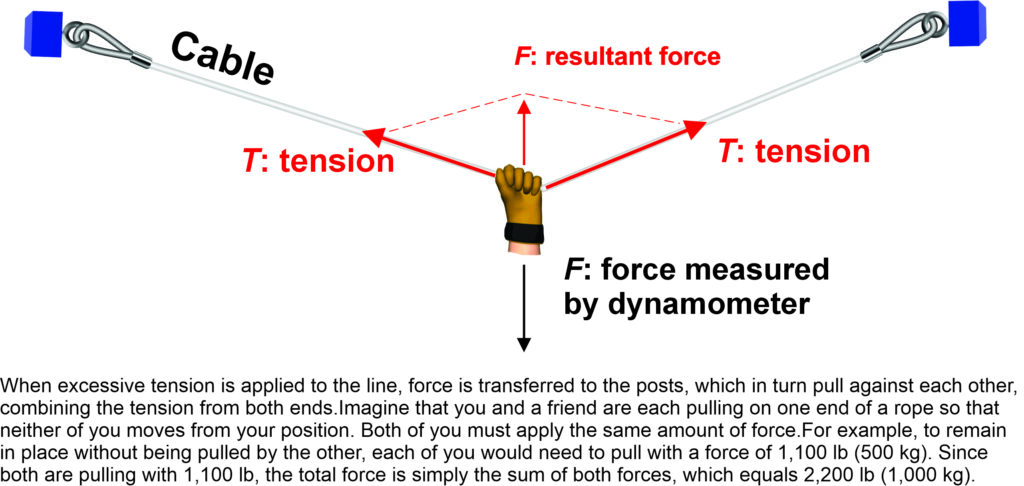
By this, I mean that the cable line should not be over-tensioned. In fact, it should have a slight sag—what we might casually call a “belly”—of about 4 in (10 cm) relative to the horizontal. Installers typically use a device that indicates when the line has reached the correct installation tension, ensuring the system is properly set. If the line is too tight, the weight of the cable itself can compromise the system’s strength.
Let’s look at an example.
Imagine tensioning a heavy steel cable like a guitar string. By doing so, you are already applying significant force to the primary supports, which, remember, are rated for 5,000 lb (2,267 kg) each. The anchor points would already be working beyond what they should, just from holding the cable’s tension. Additionally, if the line includes a tension absorber or fuse, it could begin to activate without the system ever being used.
Remember: the cable itself has weight.
Segmenting the Line

As mentioned earlier, the secondary supports that help carry the weight of the cable are installed with a maximum spacing of 33 ft (10 m). In other words, the line should be segmented at least every 33 ft (10 m). However, it is also important to consider that no more than two people should be connected within each free span between secondary supports.
But what happens if, within those 33 ft (10 m), you need to have four or more workers?
Remember, we said the spacing is a maximum of 33 ft (10 m), which means the supports can be placed closer together. If, for example, four workers must operate within a 33 ft (10 m) section, the secondary supports can be installed every 16 ft (5 m), allowing two workers per span, and two more in the next span, and so on if additional workers are required.
So, depending on the situation, the line should be segmented either every 33 ft (10 m) or every two workers.
Why is it important to segment the line every two workers?
Let’s look at an example.
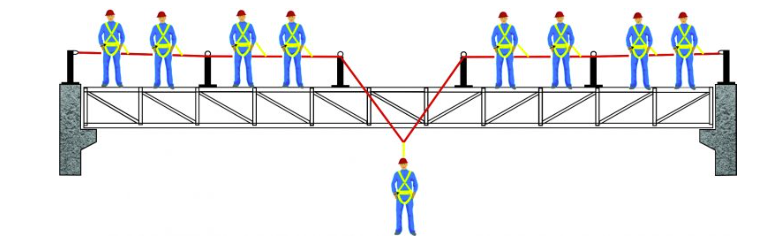
Imagine two identical scenarios where two steel beams on the roof of an open hangar need to be painted (the hangar is only a structural frame). For tasks such as grinding, sanding, painting, and similar activities, ten workers must be positioned simultaneously on each beam, and all of them must be protected by a horizontal anchorage system. Forget about the length of the beam—the key point here is that there are ten workers, so the system must be segmented accordingly.
Let’s compare the two scenarios—one properly segmented and the other not.
If the line on this beam is not segmented every two workers and one person falls, the “V” shape created by the line under the fallen person’s weight could pull all the other workers connected to it. This could result not only in a multiple fall, but also in excessive load being applied to the anchorage points. Remember, there should be one anchorage point per person.

On the other hand, if the line is segmented every two workers and one person falls, at most only their partner in that section could be affected. Because the line is segmented, the “V” shape would form only within that specific span, while for the others, the line would simply tighten without dragging them along.
You might be wondering why, if an anchorage point is rated for a single person, it can handle two people in this situation.
Keep in mind that these systems have two primary supports—one at each end—and these supports have the same characteristics as any standard anchorage point. In other words, this system effectively has two anchorage points, each capable of supporting at least 5,000 lb (2,267 kg).
Temporary or Portable Horizontal Anchorage System
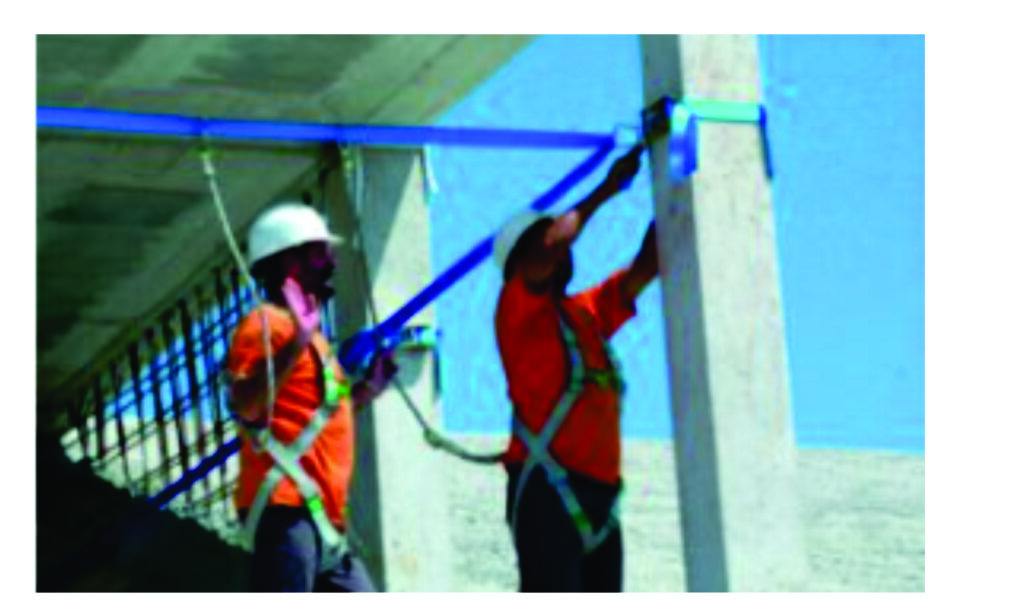
Unlike fixed or permanent horizontal anchorage systems, these do not remain installed on the structures where they are used. They contain very few metal components, and most of their elements are made of textile materials such as ropes, twisted lines, and webbing, making them lighter than the permanent systems. They follow nearly the same principles as fixed horizontal anchorage systems in both configuration and use, with small differences—such as the amount of tension applied to the main line, which can be greater than that of a steel cable due to its lighter weight.
Although each manufacturer designs its own versions of the system components to improve user comfort, these devices perform the same specific functions regardless of their shape.
These systems also include primary and secondary supports, which may consist of mobile anchor points, anchorage slings, or webbing straps with carabiners. The rope, twisted line, or webbing serves as the line to which the user connects. This line may include a shock absorber and a tensioning and release device that allows the line to be tightened for use and easily loosened for removal. Some systems also include a tension indicator that shows when the line has been properly tensioned.

Combining Horizontal Anchorage Systems with Vertical Anchorage Systems
As you read in the title of this section, horizontal anchorage systems can also be combined with vertical anchorage systems when greater versatility is needed. These combinations allow us to solve that “missing link” we often encounter while working at height.
Let’s see how vertical anchorage systems can be combined with the two types of horizontal anchorage systems mentioned earlier:
Low Horizontal Systems
Many times, we find that a horizontal anchorage system installed on a roof does not seem to serve our needs, because the equipment or structures that require maintenance are located far from the system. This can lead us to think that the person or company that installed it did so incorrectly. However, that is not the case.
What actually happens is not that the system was installed incorrectly, but that it is not being used as intended. Many of these systems are installed with the expectation that they will be used in combination with vertical anchorage systems, allowing access to areas far from the roof edge. (Remember, it is impossible to cover an entire roof with cable.)
This is done by connecting a vertical anchorage system to the steel cable or rope, allowing the user to move away from the horizontal anchorage system while always remaining connected to it.
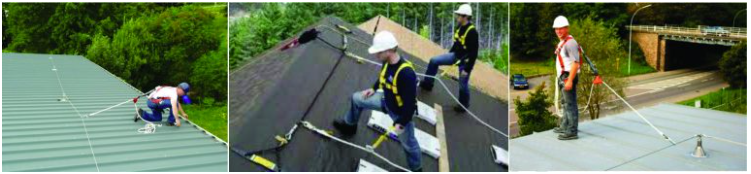
NOTE: If the slope is very steep, a fall arrester should not be used. Instead, a descent device, like those used in rope access, should be used.
Elevated Horizontal Systems
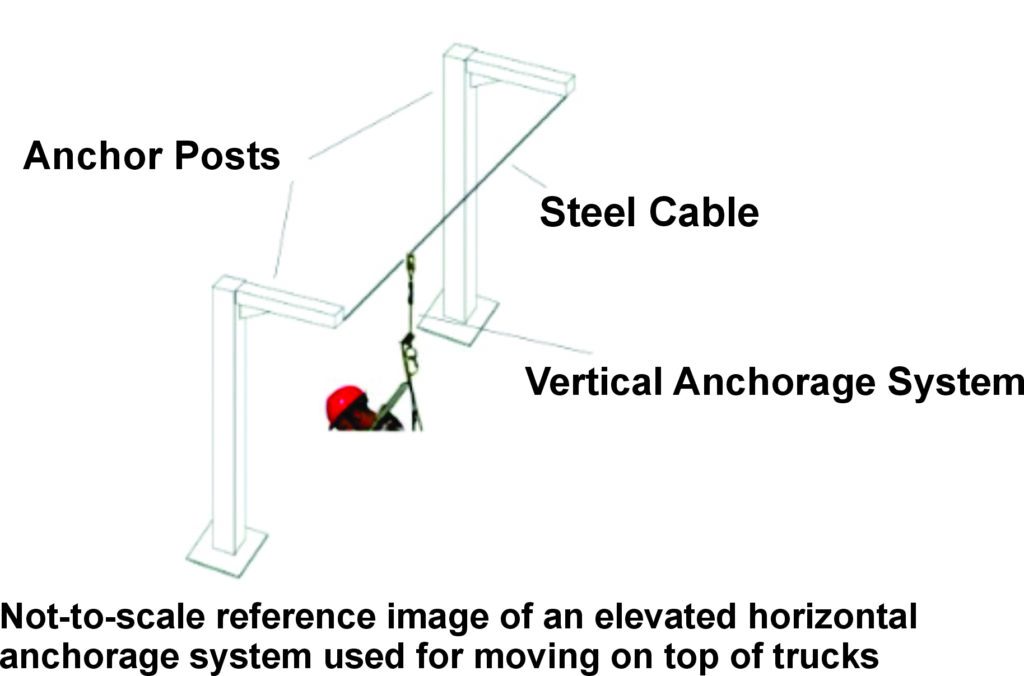
This combination is very common when a system is needed to move safely on top of trucks (this is just a common example, but the same setup is used in many elevated horizontal systems). In this case, the vertical anchorage system is also connected to the steel cable, allowing the user to remain protected while moving across these and other structures.
The advantage is that the vertical system moves freely along the steel cable, following the user’s movement and always staying above them, which helps prevent a pendulum fall in the event of a fall.
Rail-Based Horizontal Anchorage System
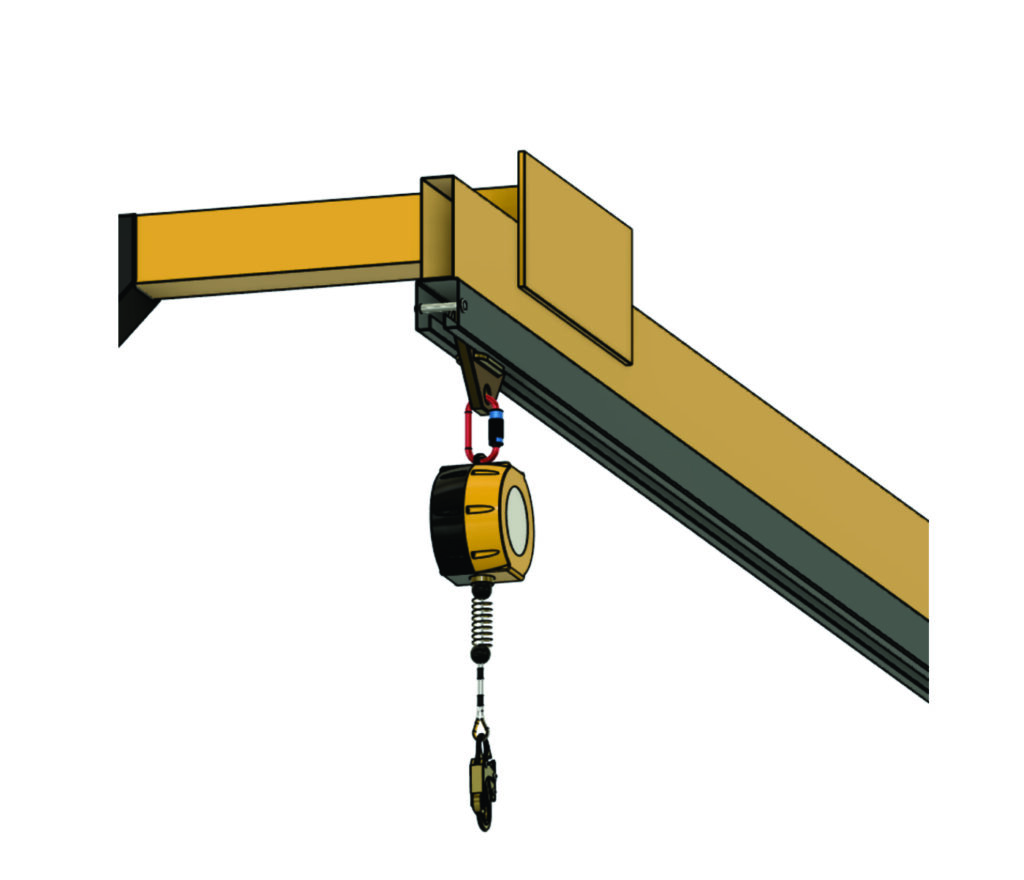
This horizontal anchorage system performs the same functions as the ones previously described, with the difference that it does not use a cable, rope, or webbing. Instead, it uses a rail along which an anchorage trolley moves, traveling the length of the rail while always remaining above the user (similar to an elevated horizontal system combined with a vertical anchorage system).
This rail system is used when a vertical anchorage system is not desired as the connecting element, but rather a self-retracting lifeline. Since a self-retracting lifeline is relatively heavy, it would cause excessive deflection in a steel cable and prevent it from moving freely with the worker’s motion (remember, the steel cable should not be over-tensioned). The rail, being a rigid structure, does not deform under the weight of the self-retracting lifeline.
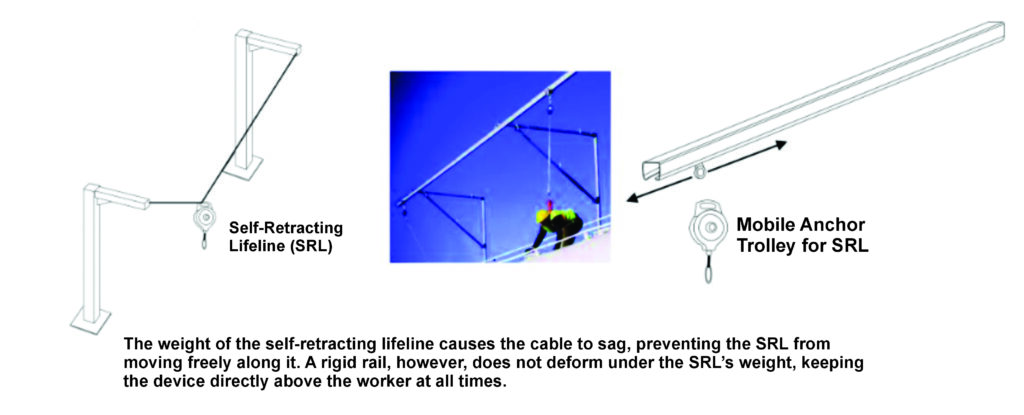
Remember: If a self-retracting lifeline is used, a rail must be used—not a cable.
I hope this article has not felt overwhelming. It is difficult to keep it short without covering the essential aspects you need to understand in order to use these systems correctly. Keep in mind that these are systems designed to save your life in the event of a fall, and never let overconfidence lead you to underestimate the importance of their proper configuration and installation.
Wishing you a safe day.
Until next time.
Author: Gianfranco Binda
Bison Up – High Access Specialist